My 2p about ERP Solutions, Information Worker Solutions and other software products (mainly Microsoft Dynamics AX and Microsoft SharePoint).
Showing posts with label application templates. Show all posts

10 November 2008

Lookup user info in a Workflow

Business Requirement: Use the Name user property in an Email sent out by a Workflow


Suppose following scenario: you have created a site based on the Help Desk template, one of the Application Templates for Windows SharePoint Services 3.0. With Microsoft Office SharePoint Designer 2007, you have added a Workflow to the Service Requests list which sends out an email each time a service request is changed to the Service Representative.


Problem is that the user information in the email will be the Account, though you would prefer to have the Name in the email.


Solution: Use the Useful Sharepoint Designer Custom Workflow Activities solution


The Useful Sharepoint Designer Custom Workflow Activities solution adds some Workflow activities to the ones out of the box. One interesting activity is the one to lookup user info. This activity can be used to have the Name in the sent email in stead of the Account.

To achieve this, follow the next steps:
  1. Add the Useful Sharepoint Designer Custom Workflow Activities solution to the SharePoint solution store. A nice wizard will guide you through the setup process.

  2. Go to SharePoint Central Administration->Application Management->Manage Web Application Features and activate the Useful Sharepoint Designer Activities feature.

  3. In Microsoft Office SharePoint Designer 2007, open up your previously created Workflow (double-click the .xoml file).

  4. Add two variables UserNameServiceRep and UserNameModifiedBy to your Workflow: it will be used to store the Name of both user accounts in the Workflow.


  5. Add two Lookup site user property Actions (this is an Action which is added by the solution Useful Sharepoint Designer Custom Workflow Activities) to the workflow before the Action Send an Email. Lookup the user property LinkTitle for the users Service Representative and Modified By. Store the values in the previously created Workflow variables UserNameServiceRep and UserNameModifiedBy.


  6. Edit the body of the Email as such that the content of the previously created variables is used in stead of the content of the fields in the Service Request.


  7. Click the Finish button in the Workflow wizard: a new version for your Workflow will be created.


If you now edit a Service Request, you'll have the Name nicely in the sent Email in stead of the Account. In the same way you could add other User Information fields to the sent out Email.


Continue reading......

by Patrik Luca 6 comments

25 September 2008

How to trigger a workflow based on a non-empty Comments field?

At an installation where I created a helpdesk functionality based on the Help Desk template, one of the Application Templates for Windows SharePoint Services 3.0, I was asked to create a workflow which sends out an email automatically when a comments is added to a service request. The email may not be sent out if the comments added was empty.
I thought this wouldn't cause much of a problem and started creating the workflow with Microsoft Office SharePoint Designer 2007. The condition checked to evaluate if an email should be sent out was If Comments is not empty.


I created a service request, next edited it and entered a value for the Comments column. I received an email triggered by my workflow for this change, which was expected. I edited the same service request again, without entering a value for the Comments column. I received an email triggered by my workflow, which I didn't expected, as my Comments added was empty. I edited the service request again, entering a value for the Comments column, resulting in the expected reception of an email.


So apparently, the Comments column wasn't empty, even if you didn't enter a value for it upon editing the service request. I thought this had something to do with the fact that the Comments field was a Multiple lines of text type of information field with the property Append Changes to Existing Text set to Yes. But I had no idea why the workflow reacted on each change of a service request as if the Comments field wasn't empty. So I created another workflow which copied the value of the Comments field into another field. This other field had as type of information Single line of Text. I immediately understood why the workflow sent out an email each time: apparently there are <div> tags placed around each Comments field change. Not entering a value for the Comments field, nevertheless resulted in a value of <div></div>. So I changed my workflow to take this into account, and hey, no mails were sent out anymore if the end-user edited a service request without entering a value for the Comments field.


Continue reading......

by Patrik Luca 7 comments

18 June 2008

Extension to the Budgeting and Tracking Multiple Projects application template

Business Scenario


You have set up the Budgeting and Tracking Multiple Projects application template, one of the 40 fantastic Application Templates for Windows SharePoint Services 3.0.
You have created some Projects in the Projects List and some Project Tasks in the Project Tasks list.

You want to view these project tasks as a Microsoft Office Visio 2007 Flow Diagram. Moreover, you want to keep your Visio drawing in synch with the SharePoint list data.

Solution


Based on the MSDN article Integrating Visio 2007 and SharePoint Products and Technologies, I worked out following demo script:
  1. Start Microsoft Office Visio 2007.

  2. Create a new Visio file based on the Cross Functional Flowchart template. Choose the horizontal band orientation and 5 bands.

  3. Connect this Visio diagram to an external data source. We are going to connect it to our Project Tasks list in our SharePoint site, based on the Budgeting and Tracking Multiple Projects template.
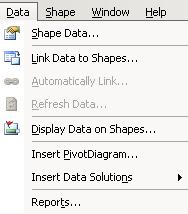
    1. Choose Data.

    2. Choose Link Data to Shapes
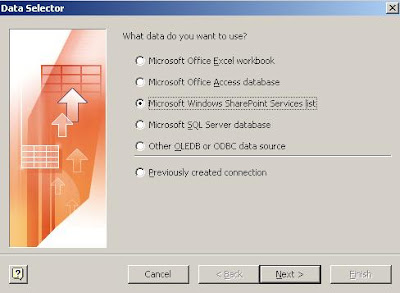
    3. Choose Microsoft Windows SharePoint Services list.

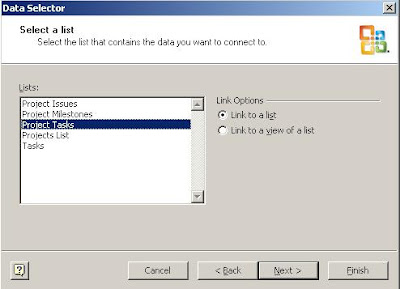
    4. Select the site on which your Project Tasks list is available.

    5. Select the list Project Tasks
    6. Finish the wizard.

  4. Your data from your Project Tasks list are now linked in your Visio drawing.

  5. Put a Process block on your Visio drawing for each project task.

  6. Drag and drop the first Project Task from the External Data section to the first Process block on your Visio drawing. A little chain icon should appear in front of your first Project Task in the External Data section.

  7. Right-click the Process block and choose Data->Edit Data Graphic.

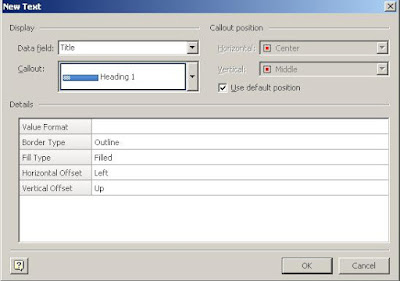
  8. Choose New Item->Text

  9. Choose as Data Field Title and as Callout Heading 1. Click OK.

  10. Add another Text Item, choose as Data Field Assigned To, as Callout Text callout and set the property Label Position to Not Shown. Click OK.

  11. Choose New Item->Color by Value.

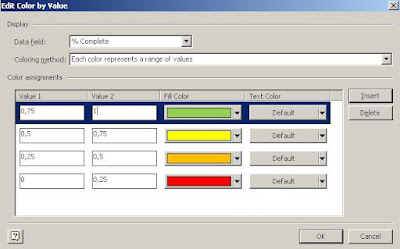
  12. Choose as Data field % Complete and as Coloring method Each color represents a range of values. In the lower part of the screen you specify the ranges and their colors.

    Choose OK.

  13. You can add additional fields that you want to display in the Process block in the same manner. After having added all your desired fields, choose OK in the Edit Data Graphic form.

  14. Select this Process block and apply the same formatting to the other Process blocks in your Visio diagram by using the Format Painter (SHIFT+CTRL+P) functionality.

  15. Drag and drop the other Project Tasks in the External Data section to the other Process blocks on the Visio diagram.

  16. Connect your Process blocks using the Visio Connector Tool.

  17. Choose Format->Theme, and apply a Theme to your Visio diagram.

  18. Save your Visio diagram.


Now you have a Visio diagram which is linked to the Project Tasks SharePoint list.
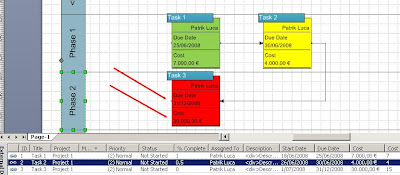
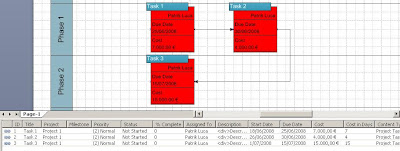
Data changes on items in the SharePoint list will be reflected automatically in the Visio diagram. Moreover, we have added a coloring scheme to our Visio diagram, based on the % Complete column: this will result in a change of color for our Process blocks upon changing the % Complete value in our SharePoint Project Tasks list.


  1. Go to your Project Tasks list in SharePoint.

  2. Change some of the values for columns you have chosen to be displayed in your Visio diagram.
  3. Change the value for the % Complete column.

  4. (Re)open your Visio diagram.

  5. Choose Data->Refresh Data. Choose Refresh All.


In my example, I have changed the Cost and Due Date for Task 3. I have changed also the % Complete for all of my Project Tasks as such that different color schemes should be applied for each of the Project Tasks, based on my settings in the previous steps. My Visio flowchart looks as follows after refreshing the data:


This offers great opportunities to visualize SharePoint list data by simply using Microsoft Office Visio 2007 and without code needs!


Continue reading......

by Patrik Luca 1 comments

06 May 2008

Online resources about the application templates

I ran into an interesting set of online resources about the 40 application templates: moreover, they are nicely grouped. A must read for everybody looking for information about the application templates or is looking for some tips & tricks, tools or add-ons on the application templates.


Continue reading......

by Patrik Luca 0 comments

08 April 2008

Fill field by default with current user

Business requirement: how to fill a field by default with the current user?


Having set up the Help Desk template (one of the 40 application templates), my end-users asked if the field Customer could be filled up by default with the user creating the service request. The Customer field should only be filled up by default if the creator of the service request didn't fill out a value himself. The option should left open for the end-user to create a service request for somebody else: in such a case the end-users still needed to be able to fill out a value themselves (being the login of the colleague for whom they were submitting a service request).

Solution: use a workflow to set the default user to the current user


Part 1: Set customer column not required


  1. Set the column setting Require that this column contains information to No.


Part 2: Create a workflow to set the default user to the current user


  1. Create a new workflow in Microsoft Office SharePoint Designer 2007: File->New->Workflow.

  2. Give a name for the workflow, attach it to the Service Requests SharePoint list and check the option Automatically start this workflow when a new item is created.

  3. Check for the condition If Customer is empty

  4. As Action choose Set Field in Current Item

    1. Choose the field Customer.

    2. For the value, choose User who created current item (it will be translated by Microsoft Office SharePoint Designer 2007 to Service Requests:Created By.


  5. Click Finish


Continue reading......

by Patrik Luca 5 comments

24 March 2008

Extension to the Rooms and Equipment Reservation application template

Business Scenario


You have set up the Room and Equipment Reservations application template. Some resources are created, for example:
  • Resource Name: Conference Room 1; Resource Type:Conference Room
  • Resource Name: Conference Room 2; Resource Type:Conference Room

Some of your end-users start creating reservations, for example:
  • Start Date: 24-03-2008 1 PM 00
  • End Date: 24-03-2008 3 PM 30
  • Resource: Conference Room 1

Those users would like to send out an appointment with Microsoft Outlook right away from within SharePoint, taking into account the data they have already provided upon creation of the reservation in SharePoint.

Solution


To achieve this, I combined some of my SharePoint knowledge, with a Javascript snippet I found on the web written by Brian White.

As prerequisite for the solution, Microsoft Outlook should be installed on the client machine with which the SharePoint site is being accessed.
  1. Open the MyReservations.aspx page with Microsoft SharePoint Designer 2007.
  2. Right-click the ListViewWebPart and choose Convert to XSLT Data View.

     
  3. Right-click the last column of the created grid, and choose Insert -> Column to the Right
  4. Give the column the title Outlook Appointment.
  5. Go to the code view.
  6. Insert right after the PlaceHolderMain tag following code snippet:
    <script type="text/javascript">

    function createOutlookAppointment(title,meetinglocation,startdate,enddate)
    {

    newAppt = new appt(title, meetinglocation, formatIncomingDateTime(startdate),
    formatIncomingDateTime(enddate));

    saveAppt( newAppt );
    }
    function formatIncomingDateTime(incomingDateTime){

    var datePart = incomingDateTime.substring(0,10);
    var timePartHours = incomingDateTime.substring(11,13);
    var timePartMinSecs = incomingDateTime.substring(13,16);

    timePartHoursInt = parseInt(timePartHours,10) + 1;
    timePartHours = timePartHoursInt.toString();
    return datePart.concat(' '.concat(timePartHours).concat(timePartMinSecs));
    }

    function appt( Subject, Location, Start, End){

    this.Subject = Location;
    this.Location = Location;
    this.Start = Start;
    this.End = End;


    this.ReminderMinutesBeforeStart = 15;
    }
    function saveAppt( obj ){

    var olAppointmentItem = 1;

    out = new ActiveXObject( "Outlook.Application" );

    appt = out.CreateItem( olAppointmentItem );

    appt.Subject = obj.Subject;
    appt.Location = obj.Location;
    appt.Start = obj.Start;
    appt.End = obj.End;


    appt.ReminderMinutesBeforeStart = obj.ReminderMinutesBeforeStart;

    appt.Display();
    return null;
    }
    </script>


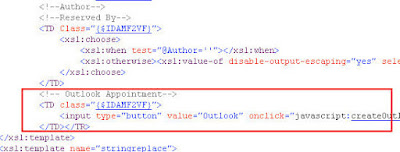
  7. Go to the <td> tag of your newly created column (search for Reserved By, it will be a couple of lines beneath it). Add a button which will execute previously created code snippet:
    <input type="button" value="Outlook" 
    onclick="javascript:createOutlookAppointment('{@Title}','{@Resource}',
    '{@RERStartDate}','{@REREndDate}');return true;"/>


As a result the users will have next to each reservation a button.
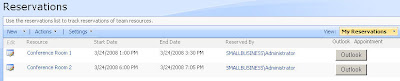


Clicking on the button will create a Microsoft Outlook appointment with the data previously entered upon creation of the reservation in Microsoft SharePoint.
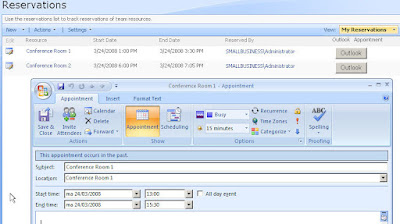


You can extend the Reservations list, by adding additional columns, whose data could be added upon creation of the Microsoft Outlook appointment.


Continue reading......

by Patrik Luca 33 comments

08 March 2008

40 application templates: where are the site content types?

Upon using one of the 40 application templates provided by Microsoft, you may be wondering where the site content types are, with which these templates are build. The site content types belong to the site content type group _Hidden: hence they are not visible on the site content types page.

This can be annoying in following scenarios:

  • If you want to create a new site content type which has as parent content type one of those hidden site content types, you can't.

  • If you want to limit the data displayed in a Content Query Web Part on a certain page in your sites, you cannot filter on the Content Type for those hidden site content types.

To move the site content types included in the 40 application templates out of the _Hidden site content type group, follow these steps:
  1. Go to the directory %Program Files%\Common Files\Microsoft Shared\web server extensions\12\TEMPLATE\FEATURES\TSATypes

  2. Open the CTypes.xml file with an editor.

  3. Search for the Site Content Type that you would like to make visible in the GUI. I'll give the example with the Service Request Site Content Type of the Helpdesk Application Template.

  4. In the Content Type tag, replace the value for the site content type group (which is set to _Hidden) with the value $Resources:core,List_Content_Types;

  5. Execute following script (it deactivates and reactivates the tsatypes feature and executes an iisreset:
    echo off
    @set PATH=C:\Program Files\Common Files\Microsoft Shared\web server extensions\12\BIN;%PATH%
    @if "%1"=="" (goto invalidParameters)
    stsadm -o deactivatefeature -filename "tsatypes\feature.xml" -url %1
    stsadm -o activatefeature -filename "tsatypes\feature.xml" -url %1
    iisreset
    @goto endOfBatch
    :invalidParameters
    @echo Please call with the correct parameters.
    @echo The correct syntax of this command is:
    @echo tsatypes [siteurl]
    :endOfBatch


Go to Site Actions -> Site Settings -> Site content types: the Service Request Site Content Type is visible on the page in the group List Content Types. Hence it can be used as parent content type for new site content types.

In the Content Query Web Part, the Service Request Site Content Type can be chosen to filter on: choose List Content Types in the dropdown box Show items of this content type group and choose the Service Request Site Content Type in the dropdown box Show items of this content type.


Continue reading......
by Patrik Luca 3 comments

Patrik Luca, Ieper, BELGIUM
Feel free to use or spread all of the content on my blog. In return, linking back to my blog would be greatly appreciated. All my posts and articles are provided "AS IS" with no warranties.

Subscribe feeds via e-mail
Subscribe in your preferred RSS reader

Subscribe feeds rss Most Read Entries

Categories

Recommended Books


Subscribe feeds rss Recent Comments

This Blog is part of the U Comment I Follow movement in blogosphere. Means the comment field of this blog is made DOFOLLOW. Spam wont be tolerated.

Blog Archive

My Blog List

Followers

Links